Diving into microcontrollers teaches you way more than just how to build cool gadgets.
You get a crash course in coding, figure out how electronics really work, and sharpen your problem-solving skills, all while creating functional products.
The first time I heard about an Arduino was in University. I didn’t quite understand what it was so I bought a small kit and started experimenting. It was a crazy journey that got me into coding, electronics and tech orientation in general.
Watch Introduction Video
This video demonstrates the
For those who wish to follow
Prerequisites
- Arduino IDE – download here
- Arduino Uno
- Breadboard
- Male-male wire
- 220 ohm resistor
- LED
Wiring
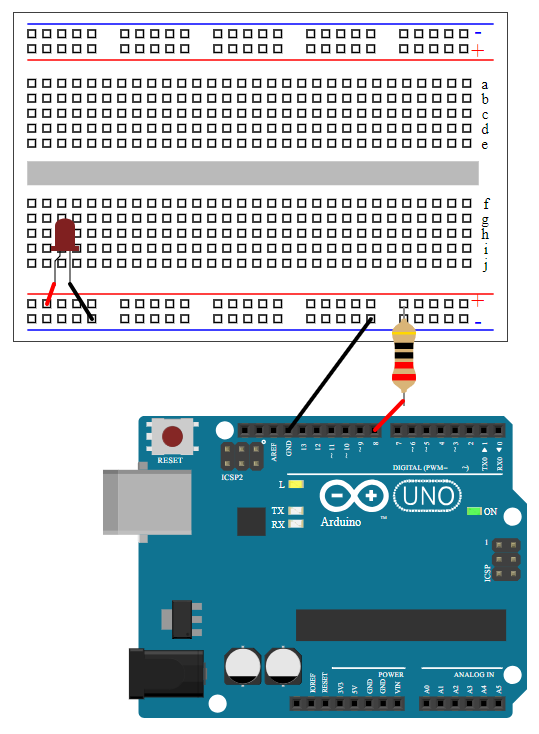
In this example, pin 8, which is out 5v output pin is connected to the 220Ω resistor. Generally speaking, the resistor can be either on the 5v side or GND side of the LED.
The resistance in determined by Ohms law: I = V/R
Where:
- I is the current flowing through the circuit (in amperes, A)
- V is the voltage across the circuit (in volts, V)
- R is the resistance in the circuit (in ohms, Ω)
The LEDs draw around 25 mA which is 0.025A and the voltage provided by the arduino is 5V, hence:
0.025 = 5/R —-> R = 200Ω
0.025 = 5/R —-> R = 200Ω
220Ω is used to be on the safe side of things.

Code attached
Arduino
				void setup() {
  // put your setup code here, to run once:
  pinMode(8,OUTPUT); // setting pin 8 to be output
}

void loop() {
  // put your main code here, to run repeatedly:
  digitalWrite(8,HIGH); // turn on
  delay(3000); // wait 3 seconds
  digitalWrite(8,LOW); // turn off
  delay(5000); // wait 5 seconds
}